Resources
Guides
How to create voicebank in UTAU
1.Choose a reclist: This determines the language you'll record in and the recording method (CV, VCV, or CVVC). I’ll explain reclists in more detail in another post. 2.Record all sounds from the reclist: Do this in a monotone voice, in complete silence. Save each recording in WAV format. 3.Set up the voicebank in UTAU: Once everything is recorded, open UTAU, select your voice folder, and go to the “Voicebank Settings” menu.

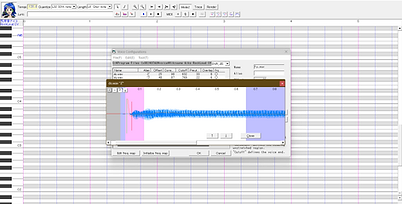
4.Adjust the sliders Blue area (start of the recording): This trims unwanted sounds like breathing, clicks, or silence. Pink area ("Consonant"): It’s best to stretch this halfway or more. This controls how the consonant is extended during playback. Blue area (end of the recording): This is also for trimming, but from the other side. Stretch it so the blue spectrogram looks even.
Green bar (Overlap): This defines how much the beginning of the next sound overlaps with the previous one. Technically, it’s the portion of the sample that “slides into” the previous sound to make the singing smoother. Red bar (Preutterance): This is the time in milliseconds between the start of the sample playback and the moment the voice is meant to actually “sound” in the song.

5.FRQ Map — This is a frequency map, a data set stored in .frq files. It contains waveform analysis that helps the synthesizer quickly adjust pitch. When you open a voicebank in UTAU for the first time, it automatically generates .frq files for each WAV sample. 6. Final step: Create a character.txt file — Give your voicebank a name, and optionally add character artwork. This step helps define the identity of your voicebank, but the artwork is not required.

